
You Access this through the B2B Admin tabs. From here you can perform many different actions relating to the Transactions and Masterdata that’s in the system. This piece of functionality allows you to perform operations like Offer Generation on demand.
When you access the tools tab on the B2B Admin page, you’re greeted with something that looks like this:
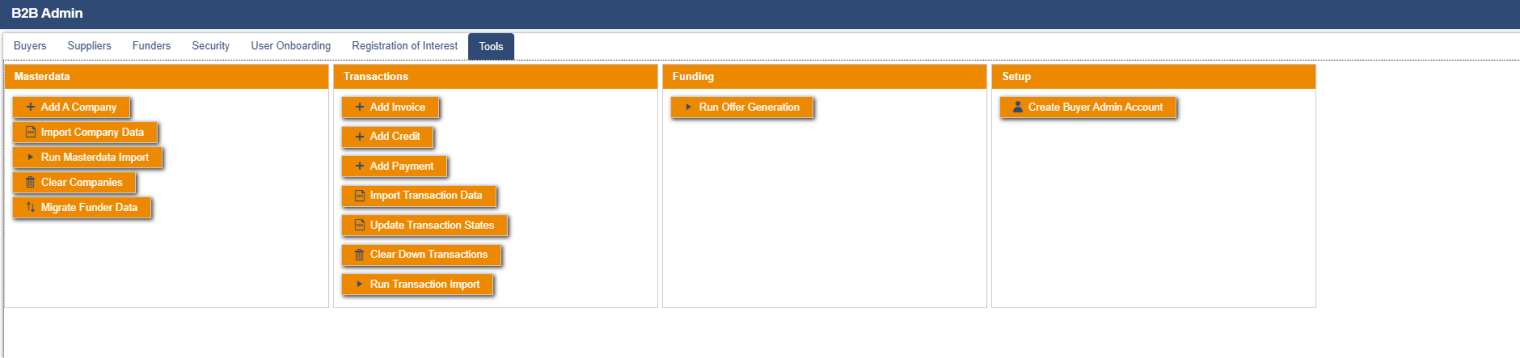
As you can see, there’s a vast number of buttons here that perform different functions. Masterdata functions relate to any company data you have in the system, Transactions functions relate to any transactions you have in the system etc. They are broken down on this page with explanations of what each button does and what button you should use as a user to achieve a certain goal.
This section relates to any data you have relating to companies in the system, they could be Buyers, Suppliers or Tools. Here, you have the ability to Add a company using our UI (perhaps it’s just one company and it’s easier this way than to create a full Masterdata file for them). You can also clear the companies in the system which will remove all company data and give you a blank slate.
Clicking on the “Add a Company” button will bring up the following dialog:
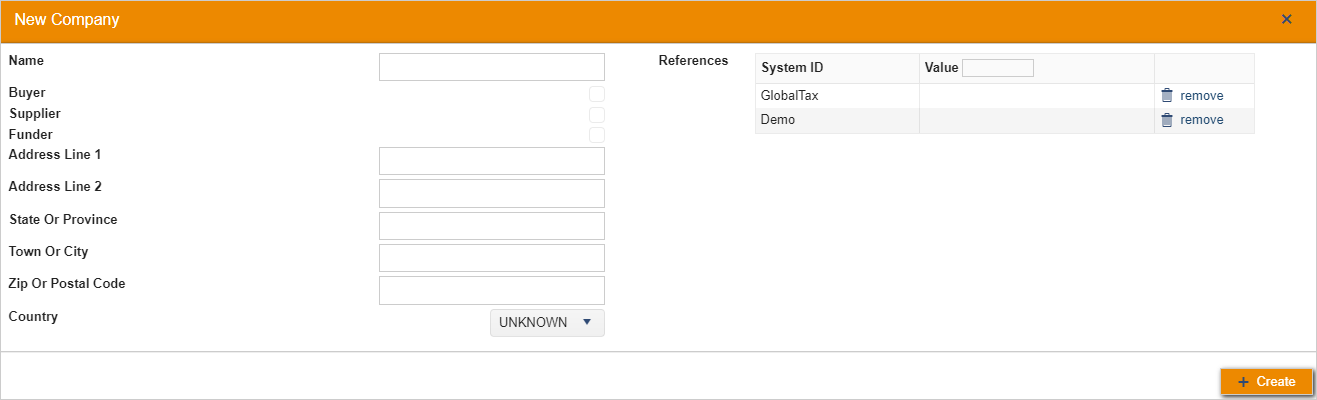
“Name” here is the name of the company you wish to import. You must select one of either “Buyer”, “Supplier” or “Funder” with the checkboxes. It’s important to note here that the address fields are also required so you must fill them in. “Global Tax” is the company’s Global Tax Reference and then the “Demo” reference is your specific reference to that company. On clicking create once all the required fields are populated, the company will then be created in the system and will be visible in the UI.
Clicking on the “Import Company Data” button will bring up the following dialog:

To import a company using this, you must follow our CSV File Format for Masterdata imports. Instead of following your usual process of uploading a file to DMS, this is a quick and easy way to import single companies or a few companies at one time. You just simply copy the data for your company in below the pre-defined header line.
This button can be used to manually kick off a Masterdata import, perhaps it didn’t run automatically as expected, click this button and within 5-10 minutes (dependant on how much data you are importing) your companies will be in the system.
WARNING
This is irreversible, do not carry this out if you do not want to clear ALL of the company data from your system.
Clicking this button will clear all companies that have been imported into the app, this is particularly useful when we are using apps for demonstration purposes as it allows you to import data into the system from a completely clean state.
Clicking the “Migrate Funder Data” button will bring up a dialog that looks something like this:
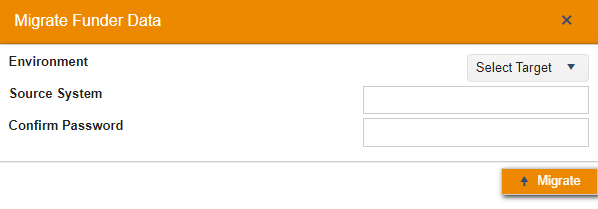
“Environment” is the environment you wish to migrate the existing funder data to, e.g. Dev or Staging. “Source System” is the source system you wish to take the funding data from and “Confirm Password” is prompting you to enter your password. This functionality is only usable if you are a bucket admin in the system you want to take the data from and the system you want to import data into.
This section relates to any data you have relating to transactions in the system, they could be Invoices, Credits or Payments. Here, you have the ability to Add a transaction using our UI (perhaps it’s just one transaction and it’s easier this way than to create a full Transaction file for them). You can also clear the transactions in the system which will remove all transactional data and give you a blank slate to import data from.
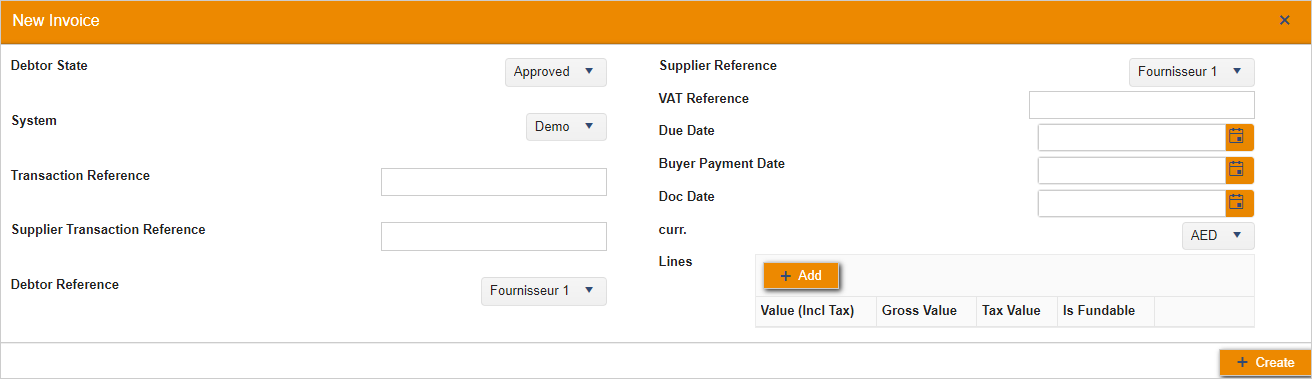
Clicking on the “Add Invoice” button will bring up the following dialog:
| Field Name | Description |
|---|---|
| Debtor State | You must select one of:
|
| System | Apps can have multiple source systems, from the dropdown select appropriate one for the invoice you’re importing. |
| Transaction Reference | This is your reference for the transaction, this needs to be globally unique as it matches future versions of the transaction using this. |
| Debtor Reference | This is your reference for the buyer. |
| Supplier Reference | This is your reference for the supplier. |
| VAT Reference | The VAT reference for the supplier. |
| Due Date | This is the expected payment date of the transaction. |
| Buyer Payment Date | The date which the transaction is due to be paid (or the date of the pay run). |
| Doc Date | The “tax point” or the issue date of the transaction. |
| Curr. | From this dropdown, you must select the appropriate currency code for your invoice. |
| Lines | This is where you input the lines onto your invoice, each time you press add and fill in the table row, it will add a line to the imported invoice. |
On filling in the fields and clicking the create button, this will create your invoice in the system.
Clicking on the “Add Credit” button will bring up the following dialog:

As you can see, this dialog is incredibly similar to the one used to import invoices. It just includes one extra field, “Related Transaction Ref” this is the field that is used to relate a credit to an invoice that’s already in the system. This field is not required as you can have Credits that are not related to invoices, but in the case you do need to relate it to one you will need its transaction reference to put into this box. On filling in the fields and clicking the create button in this dialog, the system will create your credit and it will be visible in the UI.
Clicking on the “Add Payment” button will bring up the following dialog:
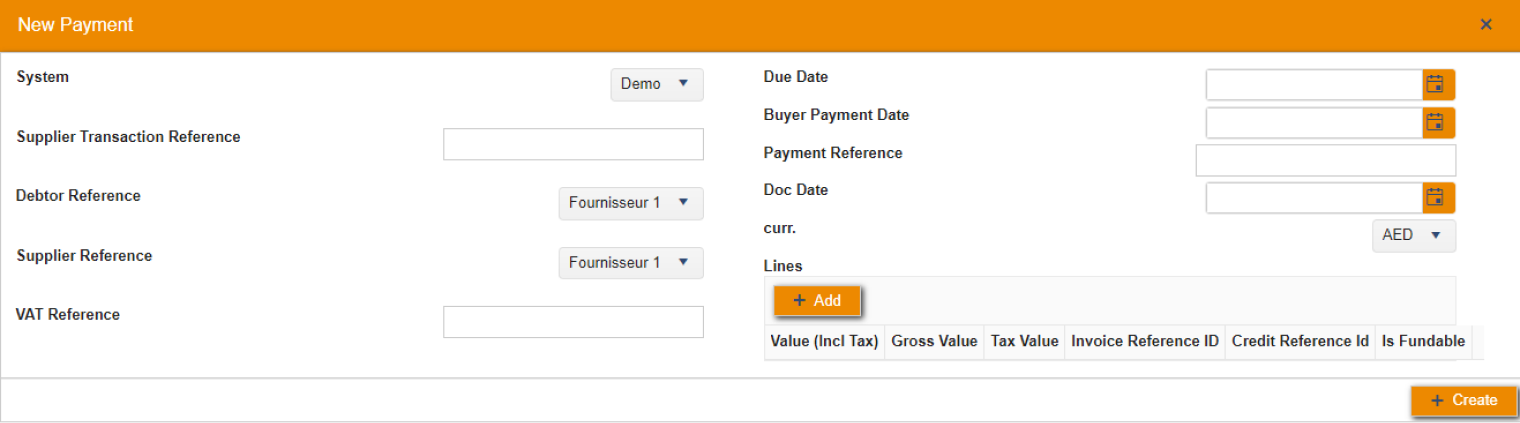
Again, this dialog is incredibly similar to that of importing invoices and credits, however there are some missing fields (due to them not being required to import a payment).The “Payment Reference” which is a unique field in this particular dialog must be filled in with the appropriate payment reference. You may also notice that there are extra columns in the lines grid you need to fill in, this is how our system relates your payment back to the transaction in our system, so it’s important that you fill these out with the Invoice reference ID and or the Credit reference ID of the invoice you wish to mark as paid in the system.
Clicking on the “Import Transaction Data” button will bring up the following dialog:
To import transactions using this UI, you must follow our CSV File Format for Transactions imports. Instead of following your usual process of uploading a file to DMS, this is a quick and easy way to import single transaction or a few transactions at one time. You just simply copy the data for your transaction in below the pre-defined header line.
Clicking on the “Update Transaction States” button will bring up the following dialog:
As you’re aware, the transactions that are imported into our system can be in many different states. They can be set to For Approval or Held for example. An example of a state change you perform frequently is setting an invoice to paid. This is done by importing an invoice where the debtor state is “Paid” this along with it’s “Payment Reference” is what tells our system to update it to display as paid. However, it is possible for you to update your transactions from one state to another. You can do this by providing us with a transaction reference that already exists in the system and ensuring that the state is whatever you want it to be updated to. This will then be shown as an update in the Transaction’s audit trail in the UI.
Instead of following your usual process of uploading a file to DMS, this is a quick and easy way to update a single transaction’s state or even a couple of transaction’s states. Once you’ve copied in your appropriate CSV line with the appropriate changed state, clicking the update button will then update this transaction in our system and any changes will be made within the UI.
WARNING
This is irreversible, do not carry this out if you do not want to clear the ALL of the transaction data from your system.
Clicking this button will clear all transactions that have been imported into the app, this is particularly useful when we are using apps for demonstration purposes as it allows you to import data into the system from a completely clean state.
This button can be used to manually kick off a Transaction import, perhaps it didn’t run automatically as expected, click this button and within 5-10 minutes (dependant on how much data you are importing) your transactions will be in the system.
This section relates to any funding processes that may be carried out in the system.
This button can be used to manually kick off a Offer, perhaps it didn’t run automatically as scheduled or you just need to run an offer generation as a one off, click this button and within 5-10 minutes your early payment offers will be in the system.
This section contains anything we require on app set up.
Clicking on the “Create Buyer Admin” button will bring up the following dialog:
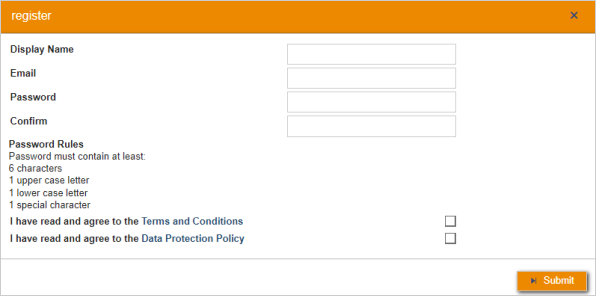
This is a simple register dialog that you should use to set up the generic buyer admin account. This account will be used to run all Transaction and Masterdata imports in the system and it will also be responsible for running the offer generation flow, getting offers into the system.