Corporate LinX - Documentation Library
Accessing Resource Management
You Access this page through the App Management Tabs. From here you can manage any resources that are specific to the app that you’re working in. This should have a very limited number of resources in it as the majority are Common Cached.
The UI
When you access the resources tab, you’re greeted with something that looks like this:

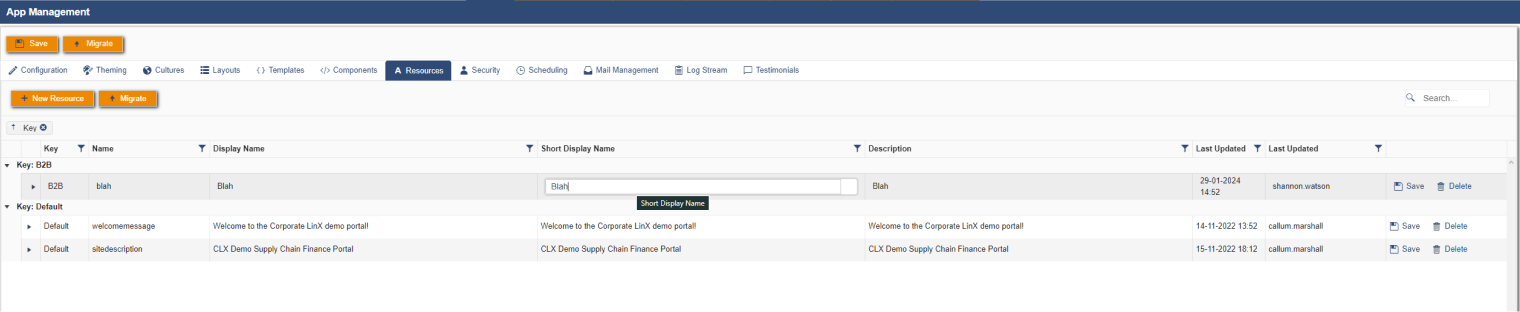
Here you can see the limited number of resources within our demo app, this is because the vast majority of them are in the common cache which essentially means that they need to exist in every portal we create. You will find that the minimal ones here are specific to this app only. When you expand a row in the UI, it allows you to see the translations for that particular resource:

Within this particular piece of UI, it allows you to manage the translations for the resource.
Creating a Resource
To create a new resource in this UI, you click on the “New Resource” button in the header bar. Clicking this will bring up a dialog that looks something like this:
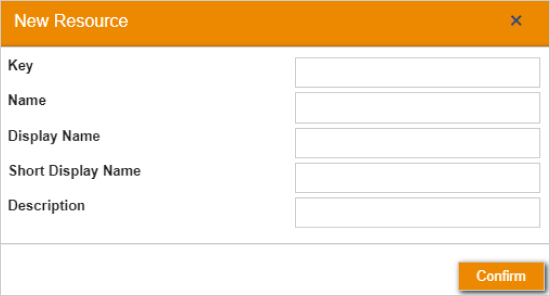
Here, “Key” is the “group” essentially that this resources fits in, this is used by a component to define what group of resources are used within it. When using a resource within a component or a page, you must use our tags “blah” for example, here, the “Name” would be filled in as “blah”. The fields “Display Name”, “Short Display Name” and “Description” are used to define how you want it to be displayed within the portal. for example you may want your “blah” resource to have a capital B so you would fill the display name field in as “Blah”. If you don’t want them to have a different short display name or an in depth description, then you need to fill all three fields with your chosen value. Once you’ve filled your fields with your desired resource values, click confirm, this will create it and it will then be visible in the UI. Creating the example blah resource returns the following in the UI.

Creating a Translation for a Resource
When you expand this new resource you see that there are no translations that exists for it just yet:

To create a translation for this resource, you click on the “New Translation” button. Clicking this will bring up a dialog that looks something like this:
![]()
Within this dialog, you select the culture you wish to create the translation for, on clicking create this will create a row in the translations grid that looks something like this:
![]()
This creates a French translation row in the table, you can understand how to alter the values in the “Updating a Resource” section of this page.
Updating a Resource
To update the resource you have created, perhaps there’s a typo or you want to change what appears in the UI, you have to click on the text you want to change which will allow you to change the text within it.
To save the changes you’ve made, you must click the “Save” button on the row relevant to the resource you’re changing.
Updating a Translation for a Resource
In order to alter a translation for a resource, you expand the resource you’re interested in and click onto the content you wish to alter, this makes it editable.
![]()
Change the content of the “Display Name”, “Short Display Name” and “Description” to the appropriate French translation and save it by clicking the save button within the translation row in the UI.
Deleting a Resource
To delete a resource that you no longer use or need, then you click the “Delete” button that will remove your resource and its content from the UI.

Deleting a Translation for a Resource
To delete a translation resource that you no longer use or need, then you click the “Delete” button that will remove that particular translation and its content from the UI.
![]()