Corporate LinX - Documentation Library
Accessing Schedule Management
You access this functionality through the App Management Tabs. From here you can manage the scheduled tasks. For example, if the Offer Generation Flow needs to be ran at a specific time each day, it’s much simpler to set it up as a recurring thing as opposed to kicking it off manually.
The UI
When you access the scheduling tab, you’re greeted with something that looks like this:

This grid will contain any existing schedules for the app, as you can see here, there are currently none in our demo app.
Creating a Schedule
To create a new template in this UI, you click on the “New Schedule” button in the header bar. Clicking this will bring up a dialog that looks something like this:
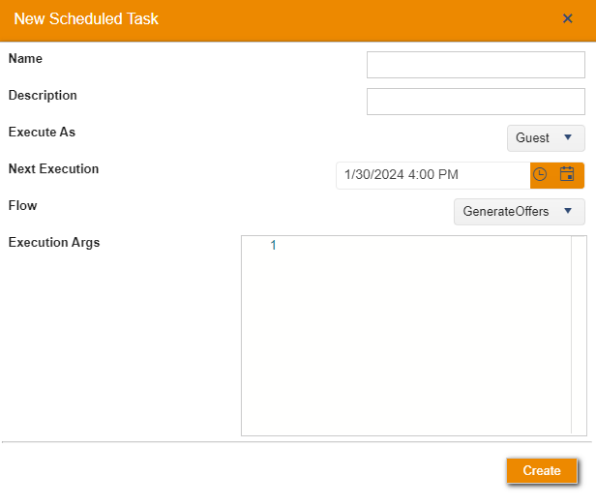
Here, “Name” needs to be populated with something referring to what the schedule is for, for
example if it’s for generating offers an appropriate name would be “Offer Generation Schedule”. The
“Description” field would need to contain something relating to the schedule and it’s intention. This could
contain something like “Run the offer generation flow daily at 9am”. “Execute As” allows you to select which
account to run this flow as, generally this is set to the system admin account that exists in all apps
(Usually “App Name” + “Admin”. “Next Execution” needs to contain the date you would like the next instance
of the flow to run, for example if you wanted it to run tomorrow at 9am, you would put in tomorrow’s date
and 9am in to the date and time pickers respectively.
We have flows for various things, importing Transactions and Masterdata for example so in the “flow” field
you select what flow you’re wanting to create the schedule for. Generally the “Execution Args” field can be
left blank, but if you have any questions regarding this, feel free to contact our team.
Filling all these fields out and pressing submit looks something like this in the UI.

As you can see, the fields are all populated. However, on creation it does not apply a schedule to it so the instance will only run once on the time and date specified in the creation dialog. To set this to run daily, you must click on the field and set the schedule to 1 day. It will look something like this:

Once you’ve clicked the save button to save the change to the schedule then the offer generation flow will run daily at the time specified in the creation form. You can also see on the other possible functions that will be.
Expanding a Schedule

Clicking the arrow on the left of the table row, will expand the schedule. Once expanded you will see another grid which will display all of the previously run instances of that flow. As you can see, because it’s not been run on this schedule yet, the grid is empty.
Updating a Schedule
You edit schedules by just clicking onto the field you want to change

The editable fields in this grid are:
- Name,
- Description,
- Schedule,
- Flow,
- Next Execution,
- Execute As.
Once you’ve made any changes you want, you click the “Save” button on the corresponding grid row and any changes you’ve made will be saved.
Deleting a Schedule
To delete a schedule that you no longer want to run at the specified time, then you click the “Delete” button that will remove your schedule and its content from the UI.
